Sunday, August 26, 2012
 Whatever - FTU Tutorial
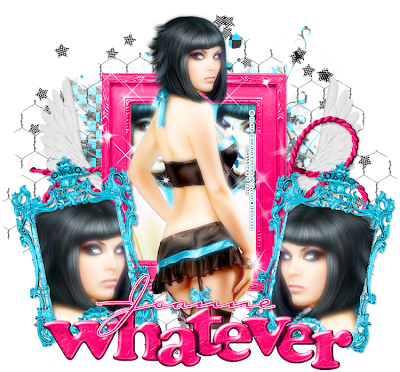
This tutoraial was made using PSP X4 but any other version of PSP should work fine.
Supplies needed:
Scrapkit of choice
Tube of choice
Mask of choice
Font of choice
Xero Plugins - Porcelain
Let's start off by opening a 750x750 blank image.
Floodfill with white for now.
The scrapkit I'm using is a FTU scrapkit and can only be found at The Creative Chicks PSP Forum.
It's free to join and no post counts needed to access our awesome goodies!
If you want to use a scrapkit of your choice, then that's fine too!
Open up element 6 and copy and paste as a new layer.
Resize the frame by approximately 65% and add a dropshadow of choice.
Now open up element 7 and resize that frame by approximately 40%.
Copy and paste as a new layer.
Move this fram to the right of your tag (use my tag as a reference)
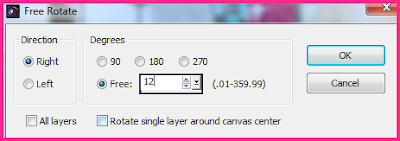
Go to image, free rotate and apply the following settings:
Duplicate this layer then mirror or flip horizontal the frame.
If you have the choice to flip horizontal then you'll have to manually adjust to match.
Add a dropshadow of choice to both frames.
Open up your tube of choice.
I'm using a tube by Zlata that can be found at The PSP Project.
You must have a license to use this image.
Ok, so open the image and paste as a new layer and resize to your liking.
I resized mine by approximately by 75% and placed it between the 2 blue frames.
Duplicate this layer and while on the duplicate layer use the following settings:
Image, adjust, blur then gaussian blur and use 5 as your radius.
While on this layer, go to your blend properties and change it to screen.
Now switch to the other tube layer.
Go to your Xero plugin and apply the porcelain effect with the following settings:
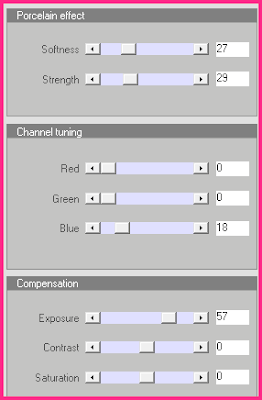
Hit ok.
Take your tube and add it as a new layer below the pink frame
Resize accordingly and place it to the left of the frame, duplicate and mirro to fit the right side.
Refer to my tag for placement.
Below these layers floodfill with a color from your tube/kit.
I'm using the color #48dbf4.
Take your magic wand and click inside the frame then go to selections, modify and expand by 10 or so.
Go back to your firs tube layer then go to selections, invert then hit delete.
With the marching ants still showing, do this for the duplicated tube layer.
Then, when those are done go to your floodfilled layer, selections, invert and hit delete again.
Now go to selections and hit select none.
Duplicate both of the tube layers and apply the exact same settings as you did for your main tube.
Except this time on the bottom tube layers go to your blend properties and select hard light.
Open up again your tube and paste as a new layer.
Resize to your liking and this time free rotate it using the same settings you did for the blue frame.
Click inside the blue frame with your magic wand and expand it by 10.
Go to selections, invert and then on the tube layer hit delete.
Duplicate this layer and mirror/flip horizontal to fit in your other blue frame.
Duplicate both tube layers and apply the settings as you did on your main tube.
Next, open up element 17 and copy and paste as a new layer.
Make this the bottom layer and add a dropshadow of choice.
Open element 22 and copy and paste as a new layer.
Place this layer above the pink frame.
Open up element 36 and copy and paste as a new layer.
Resize it by 75% and place this just above your wings layer.
Add a dropshadow of choice.
Open up element 39 and copy and paste as new layer.
Resize this layer by approximately 90% and bring this layer to the bottom.
Add a dropshadow of choice.
Open element 10 and copy and paste as a new layer.
Resize this layer by approximately 80% and bring this layer to the bottom.
Add a dropshadow of choice.
Open up the whatever wordart and copy and paste as a new layer.
Resize this layer by approximately 90% and bring this layer to the very top.
Place it at the bottom of your main tube and center it if necessary.
Add a dropshadow of choice.
Now lets open paper 12 and copy and paste as a new layer.
Place this layer at the very bottoma and resize it by 85%.
I'm using a mask by Vix and you can find it here.
Go to layers, load/save mask, load mask from disk and apply the following settings.
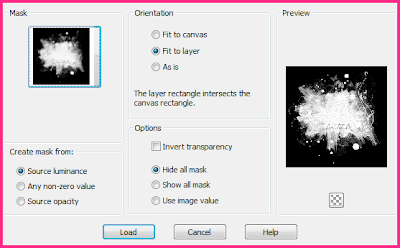
Now all you need to do is add a font of your choice.
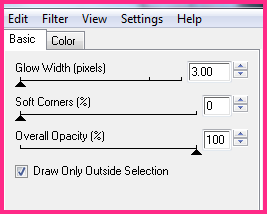
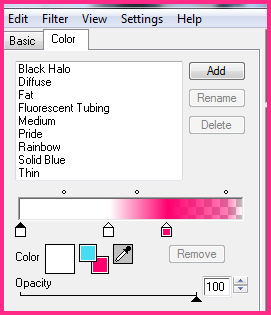
I am using carpenter Script for my name.
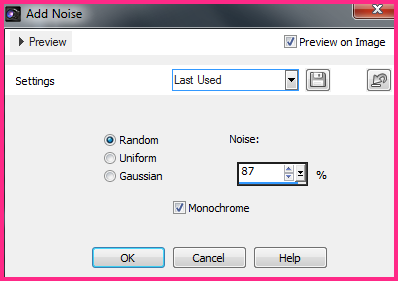
To get the same effect go to adjust, add/remove noise, add noise.
Add the following settings:
Don't forget to tag and use the proper CR information.
You can now delete the white background layer and go to file, save as a .png image.
And that's it!!
Hope this tutorial wasn't too hard to follow.
If you need any help, feel free to get in touch with me.

Subscribe to:
Post Comments (Atom)
My Blinkie


0 comments:
Post a Comment